We’re very proud to have released the first stable release of Fedora Asahi Remix not too long ago, and now it’s time to go over everything we’ve been up to. You may have wondered what’s up with the radio silence for the past few months. The answer is that we’ve been busy cramming in as many features as we could into this release. We went quite a bit over our original time estimate (as they say, the last 20% of the work takes 80% of the time), but I don’t see anyone complaining about new features. Here’s everything new in Fedora Asahi Remix. Grab some snacks, it’s long.
HDMI - Completing the line-up (almost!)
With the Fedora Asahi Remix release, we’ve caught up to Apple’s line-up through the M1 and M2 generations anew, including all the Pro/Max/Ultra variants. Keeping up with new chip and machine releases is a chore, and every single chip and platform needs to be explicitly brought up and supported (with all their quirks and magic numbers), but thankfully Apple tends to reuse most of the hardware logic between SoCs. Additionally, Asahi’s high driver code standards focusing on code reuse and composability eases the process of bringing up new machines.
But sometimes there are large changes. The reason why support for the M2-series desktops devices took so long is display output. To be clear: The M2 laptops released in summer of 2022 were supported after a few weeks. Display support for M2 Pro/Max laptops required not much more than adding support for the DCP firmware version used by the devices (initially 13.2/13.3 and finally 13.5). This left the M2 / M2 Pro Mac Minis and M2 Max/Ultra Mac Studios (M2+s) to support. Since iBoot no longer brings up HDMI, we need some Display Controller Processor (DCP) code in our bootloader m1n1 to get display on the desktops before linux loads (e.g. m1n1, u-boot, grub screen). However, unlike M1, HDMI output on M2+s is no longer managed by the DCP firmware, specifically DCP no longer handles the complete eDP -> DP2HDMI setup. In turn DCP acts more like dcpext, giving it more flexibility: for example, DCP on the M2 Mac Mini can now be routed to the USB-C/Thunderbolt ports. This makes the M2 Mac Mini Thunderbolt 4 certified. However, doing all this in our bare-metal m1n1 adds quite a bit of complexity.
In addition to the existing DCP iBoot endpoint/protocol support in m1n1, two new endpoints have to be implemented: the dptx-port endpoint for AP <=> DCP eDP setup and routing and a system endpoint for verbose syslog messages. Furthermore, the (lp)dptx-phy has to be programmed based on messages exchanged via dptx-port endpoint. Finally handling all the DP configurations, which became slightly convoluted due to the lack of consistency in Apple’s device tree and multi-die power management.
As a minor side effect, HDMI output now works on 14-/16-inch Macbook Pros as well! (only physical HDMI ports, USB-C to HDMI cables or adapters all have a DP to HDMI converter). Our DCP driver maintainer Janne Grunau put in tireless work in the bootloader, device trees, and the DCP driver to enable HDMI output. HDMI output was a TODO ever since the M1 Pro/Max series laptops. The M2+s desktop HDMI output support is based on reverse engineering and initial code by Sven Peter. Especially the HDMI output on 14-/16-inch Macbook Pros use the existing DP phy support in atcphy. It is essentially a DP-altmode on an USB-C port without USB and USB-C controller. Large parts of this work will be reused for the upcoming Type-C DisplayPort output support, which will cover all chips including the original M1 when it is released. Note that HDMI support on M2 devices and laptops requires 13.5 firmware. The work on HDMI output is not finished: HDMI output on M2+s desktops and laptops doesn’t reliably power on after s2idle (HDMI replug might fix it), resolutions/refresh rates beyond 4k 60Hz are not supported and HDMI audio support has to be finalized and tested on all devices/SoCs.
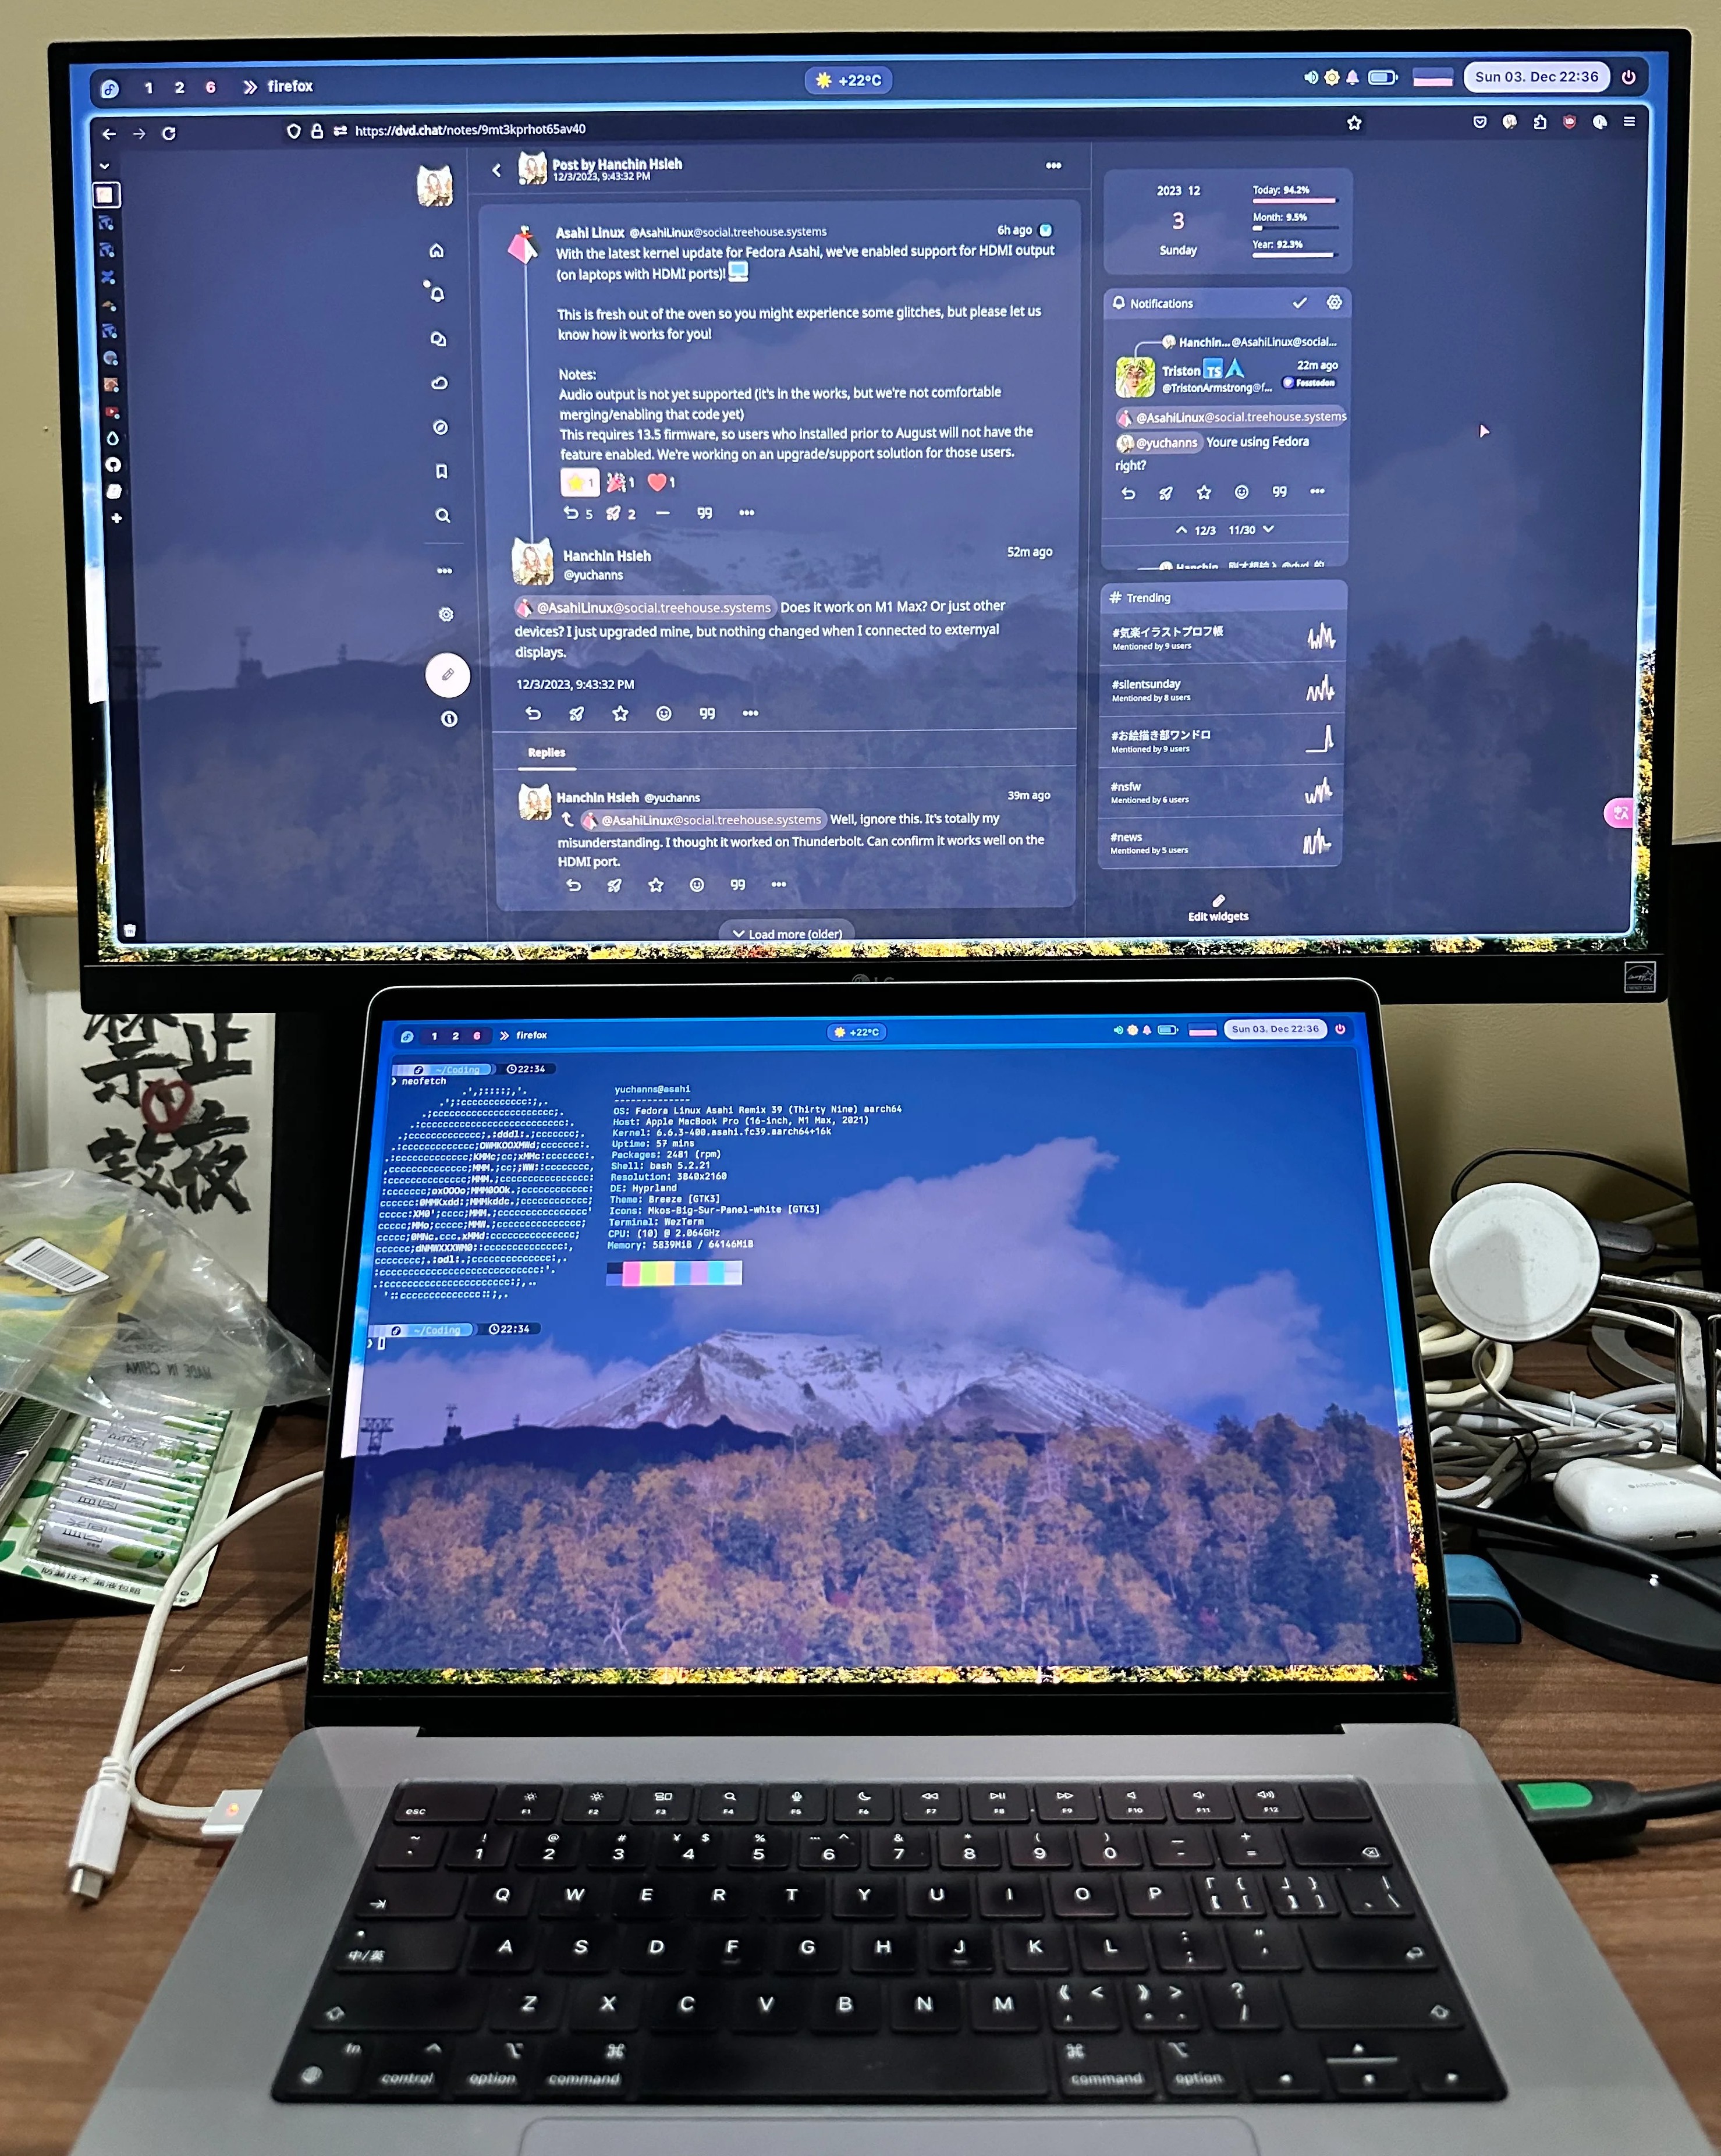
16" M1 Max running Fedora 39 Asahi Remix with 4K HDMI monitor behind.
The only platform not yet supported is the Mac Pro, although there probably isn’t much left to do. No, not the “MacBook Pro”, but the “Mac Pro” – the one that looks like a cheese grater and costs thrice as much. Few have even heard of the name. The Mac Pro is by far our least popular Mac model, and we’ve had much more urgent hardware enablement to do. And what about the M3, you say? Watch out for news this year…
GPU - Conformant OpenGL ES 3.1 & more…
Over the summer of 2023, Alyssa Rosenzweig’s GPU reverse-engineering work leapfrogged us from OpenGL 2.1 over OpenGL 3.0 up to OpenGL 3.1; similarly, the OpenGL ES 2.0 support bumped up to OpenGL ES 3.0. Just two months later, in August 2023, we shipped conformant OpenGL ES 3.1 drivers, the world’s only conformant OpenGL ES 3.1 implementation for M1- and M2-family graphics hardware.
What’s the next step? Geometry shaders are introduced in OpenGL 3.2 and OpenGL ES 3.2. A geometry shader takes as input a set of vertices that form a single primitive e.g. a point or a triangle, which then transform these vertices as it sees fit before sending them to the next shader stage. What makes the geometry shader interesting is that it is able to convert the original primitive (set of vertices) to completely different primitives, possibly generating more vertices than were initially given. In the latest Fedora release, you’ll find a newer version, OpenGL 3.3. 3.2 and 3.3 add big ticket features like geometry shaders. Since Geometry shaders are not natively supported by the Apple GPU, correctly implementing them requires driver gymnastics. This is magnified by the interactions of geometry shaders with other features like transform feedback, primitive restart, indirect draws, and tessellation. We care about correctness, a promise included with conformance. It’s paramount to implement them the correct way – which is not the easy way.
How do we implement geometry shaders without hardware support for geometry shaders? At a high level, we translate them to primitives like compute shaders, prefix sums, and indirect draws. Transform feedback is handled within the geometry-turned-compute shader. Indirect geometry draws turn into an indirect dispatch of the geometry-compute shader. Primitive restart is unrolled on the GPU with a compute prepass. Tessellation (when it is released) will feed the geometry shader as required by the spec. But is this fast? Depends. Geometry shaders are relatively slow even on desktop hardware by AMD and NVIDIA, and application developers are advised to avoid geometry shaders. Still, it’s critical that we support them correctly, because real applications use them occasionally, and we don’t want applications to be broken – the promise of conformance. But because they are known to be slow even on popular GPUs, they aren’t usually a hotspot. We just need to be fast enough. And it is.
The upshot is that we now ship work in progress OpenGL 3.3, alongside the conformant OpenGL ES 3.1, which unlocks more OpenGL applications and games to work on Asahi Linux. And we’re not stopping here ;-)
Bluetooth - Regression fixes & M2 support
After a few kernel merges, some users noticed that their Logitech Bluetooth mice were not automatically pairing anymore. While some of us accepted that such is life on Linux and started manually pairing via bluetoothctl, Janne Grunnau decided to do something about it. Following a manual git bisect of applying and testing patches one-by-one – made possible by m1n1’s hyper-fast, 10-second to desktop kernel test cycle – Janne found the exact commit regressing Bluetooth Low Energy (BLE)-based pairing (used by Logitech devices) in kernel v6.4. Small low-paced Linux sub-systems are nice.
Meanwhile, we also needed some tweaks for supporting Bluetooth on the new M2 Pro/Max and later machines, since they use a new Bluetooth/Wi-Fi chip. Aside from the usual chip-specific magic numbers, it turns out that Apple also started cryptographically signing Bluetooth firmwares - and this caused the boot process to be slower, ending up in a timeout. That took embarrassingly long to figure out, but the fix was trivial.
Wi-Fi - M2/M3 support & new features
Apple Macs ship with Broadcom Wi-Fi hardware, but Broadcom doesn’t have the closest relationship with the open source community (to put it mildly). While there is an upstream brcmfmac driver, it has seen minimal development over the past few years, with most maintainers inactive and receiving very few external contributions. Until now, most of our work on this driver was limited to enabling support for newer chips (which itself was quite a chore, as newer chips often brought new firmware versions and interfaces that needed to be supported). Most recently, we brought up the newer Wi-Fi chip (BCM4388) used in the latest Apple M2 (and M3) series machines. Bringup included support for cryptographically signed firmware and some newer protocols. We additionally fixed bugs to support newer Apple Wi-Fi firmware shipped with Sonoma (14.x). Along the way we also fixed Bluetooth crashing during sleep mode (Yes, the Wi-Fi driver crashing Bluetooth. Just Broadcom things..).
However, just bringing up new chips does nothing to address the rest of the problems of the brcmfmac driver, from lack of support for newer Wi-Fi standards to weird bugs and power/throughput limitations. Thankfully, Daniel Berlin took it upon himself to fix some of these longstanding issues and improve the Wi-Fi experience on Asahi Linux and for everyone. Wifi6 and 6E support was recently added. Throughput was also improved from around 80 Mbps max to 1200 Mbps max when connected to higher speed access points. Finally, support for low power scanning and other features significantly reduce power usage of the Wi-Fi chip.
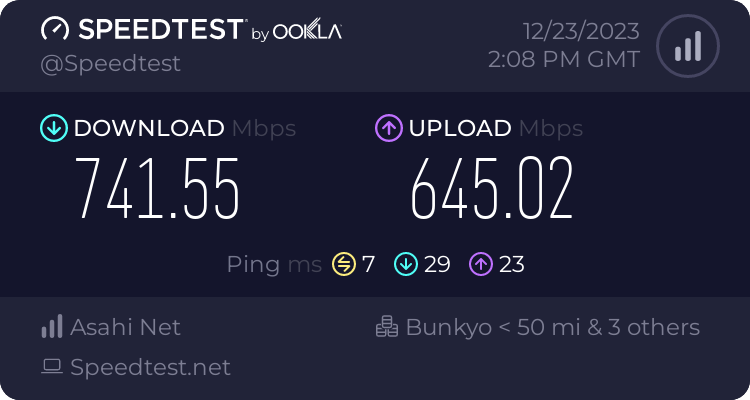
Speed test over Wi-Fi on an M2 MacBook Air 13"
Trackpad - Correct size reporting
This one’s easy: We fixed a longstanding bug where every trackpad’s size was reported as that of the 14" MacBook Pro. Back when trackpad support was added, we started off by just hard-coding in a single set of dimensions into the driver, and that mostly worked properly anyway… so nobody looked at it until now. But it does cause some subtle issues with libinput, so we finally got around to implementing support for fetching trackpad dimensions directly from the firmware. Now all trackpads, present and future, will report the right size.
Touchbar
Apple has made some questionable input/HID decisions in the past (🦋🔑 / 🪄🐭). I’m sure all our 13-inch Macbook Pro users had some strong feelings about their function row being completely black and about as responsive as a brick. ChaosPrincess, of the crowd-favorite “keyboard backlight driver”, returns with the Apple Z2 Touchscreen driver to light up our Macs anew, only this time in a much more sophisticated manner. While T2 machines could make the T2 itself deal with the touchbar and just emulate a regular keyboard function row, we do not have that luxury on Apple Silicon devices. In order to light up the touchbar, ChaosPrincess had to reverse engineer a touchscreen controller, a display output controller (which is a completely different display controller than the main one…), and write a userland daemon to drive all the hardware together. As a fun aside, those touchscreen controller and display controller are the same IP blocks as present in certain mobile iDevices, so if someone wants to use checkra1n to put full Linux on their iPhones, some of that work is now done for you ;)
Our Rust userland touchbar daemon is tiny-dfr: while we obviously do not have teams of developers dedicated to the touchbar ecosystem and third-party app integration, tiny-dfr is equipped with the most important features: showing the F{n} row and the media control keys (brightness, volume, backlight, play, etc). And since the exact contents of those key layers are configurable, feel free to look at the config template at /usr/share/tiny-dfr/config.toml, all the possible settings are extensively documented there. Note that the version currently packaged in Fedora only supports the fixed key layout, but an upcoming dnf upgrade bringing configurability is coming very soon. Tiny, yes, but very mighty.
NVRAM
You may have been burned by Bluetooth pairing failing after switching partitions, or you simply hate having to hold the power button down to select a non-default boot partition. How does the bootpicker make the Mac boot into a certain volume? Inside the NOR flash is a non-volatile random-access memory (NVRAM) section which stores various boot-related environment variables. When we select a volume, the bootpicker sets the NVRAM boot partition key as the selected volume, from which the Mac will source its boot options from on the next boot. The NVRAM also stores your Bluetooth pairing keys and WiFi configuration so that your input devices and networks seamlessly connect when in recovery mode! ChaosPrincess has developed a collection of tools that interact with the NVRAM chip present on Apple Silicon machines. The NVRAM tool suite (dnf install asahi-nvram) will be of particular interest to those who frequently switch between Linux and macOS.
asahi-bless: Allows you to select the default and next boot OS. “Blesses” the selected OS.asahi-btsync: Extracts the Bluetooth pairing keys and creates bluez configs.asahi-wifisync: Extracts the WiFi passwords and creates iwd configs.asahi-nvram: Raw access to nvram contents. Be careful with this one. Touching some keys is a ticket to DFU City, population you.
While messing with NVRAM can be dangerous and this tool suite is still in active development, asahi-bless is battle-tested and very safe to use, and is extremely convenient to change the boot volume of your Mac. Davide Cavalca is even working on a (WIP) GUI frontend around asahi-bless called Startup Disk which gives us a pretty bootpicker interface just like macOS. Additionally, asahi-btsync can be quite useful to solve Bluetooth cross-OS pairing issues. In the future, we expect to have tighter NVRAM integration with the rest of the system, so that Bluetooth and Wi-Fi synchronization is performed seamlessly and in both directions, although we’re not quite there yet.
Again, boot and disk components should always be met with caution, but thanks to Apple Silicon’s rock-solid boot security platform design, even if you try your hardest to break your system using asahi-nvram, the absolute case worst that can happen is that your machine becomes unbootable and requires another machine to reset it (DFU) – but you’ll never irreparably, permanently brick it.
Camera
To foreshadow: with good DSP, Apple can get away with shipping decades-old iPhone sensors onto the shiny-new Macs. The entire camera block (from the DisplayPort-connected CMOS sensor and the green security LED, an arm64 coprocessor, to the dedicated in-house image DSP block for filtering raw sensor output) is collectively internally called “Image Signal Processor” (ISP). That’s odd, why is the entire camera block called ISP, when clearly only the last one (the DSP block) fits the “ISP” description? The name is actually pretty understandable. Not only has Apple faithfully outsourced their image sensors from Sony for a decade and ongoing, Apple has delegated much of the capture work from hardware (sensor) to software (post-processing). In other words, they cheap out on the sensor (device trees say the 720p 2020 M1 MacBook Pro is the S5l8960x, also known as the iPhone 5S) and rely on post-processing. The camera is really a DSP block that happens to have a sensor onboard. But I bet you didn’t know that because of just how good Apple’s image DSP is (Apple just can’t help be good at cameras..).
Moving the work from hardware to software moves the complexity to the driver. We can make use of Apple’s world-class image DSP to get just as good capture output on Linux – once we make friends with the 12MB ISP RTOS firmware blob and tediously reverse-engineer triple-digits worth of device-specific DSP commands and the filter graphs in which they are called, that is. To keep it short, 5K+ lines of kernel code, 120 opcodes, 47 sensors (though we don’t use all of them), 18 power domains (the worst sequencing in history), 7 interrupt channels, 2 gross buffer hacks, and 1 teddy bear later, the green LED shone to signal the camera’s rolling, and now we can all go to ViCo meetings. Yay… Thanks Eileen.
If someone does end up porting Linux to certain handheld iDevices, and they have the luxury of caring about multimedia peripherals, the ISP driver’s got you covered. Apple uses the same camera driver across the entire Apple ecosystem, so while this might just be a webcam, our driver lists compatible sensors up to the Sony IMX913 found on the iPhone 15 Max. The ISP driver should be able to drive the latest and greatest iPhone cameras with just a little extra work on your part (we’ve left for you dealing with strobing/flash, differentiating front/rear, and syncing multiple rear channels; hint: channel initialization takes a bitmask, the boilerplate’s there).
P.S. We’re probably the only Linux desktop in existence to support vertical (FaceTime) video, and we uncovered some amusing userspace bugs from it. First, some apps default to the highest vertical solution, which results in unexpected behavior in case vertical video is offered. Additionally, if your webcam app has green diagonal lines through it, check the resolution: the app may have defaulted to vertical mode, and we found some apps were not respecting our driver’s advertised stride of 64-bytes (which the ISP hardware operates on). The skipped data is initialized to YUV zero, which converted to RGB equals green. Feel free to report the app as per our upstream-first policy (GNOME Cheese is currently known to have issues).
Speakers
Apple cares about audio quality. Like, they really care about audio quality. macOS will tell you your Mac has a single pair of stereo speakers, but in reality your Mac could have as many as six speakers, all secretly coordinated by macOS to make them seem like a single high-quality stereo pair. The 14" and 16" MacBook Pros for instance have two woofers for bass and mids and a tweeter for treble on each channel, an arrangement closer to a modern HiFi speaker than it is to most other laptops.
Still, the laws of physics put an upper limit on how good tiny speakers can sound. Apple uses a cocktail of DSP techniques to overcome these limitations, implemented as plugins for macOS’s userspace audio stack. These plugins are not compatible with Linux, so we get to either put up with terrible speaker quality, or build our own version of Apple’s plugin chain. Rather than see this as a limitation, we saw an opportunity to set ourselves a lofty goal - make Apple Silicon Macs sound better when running Asahi Linux. We think we’ve succeeded.
The most important thing for a loud, dynamic sound is power. Microspeakers need to be driven very hard in order to produce a decent sound at an acceptably loud volume. This is complicated by the fact that they are extremely delicate, and pushing even just a little bit too much power into them for even just a little bit too long is enough to permanently damage them. How do we drive these speakers hard enough to get a loud, high-quality output but not hard enough to destroy them? speakersafetyd is the world’s first (and only) Free and Open Source Software implementation of a speaker protection algorithm. The amp ICs driving each speaker communicate the voltage and current going through the speaker back to the OS. speakersafetyd uses this information, as well as a few electrical and thermal parameters known about each speaker in the machine, to approximate and track each speaker’s temperature. If things are getting a bit toasty, it will pull down the power until the speakers cool off. speakersafetyd and the kernel mechanisms behind it are incredibly robust, and if any part of the safety chain fails for whatever reason, the kernel will fail safe and cut all power to the speakers to prevent a meltdown.
Safety? Check! Now we can start having fun. Our measurements show that the speakers in the Apple Silicon Macs bottom out at around 200 Hz. This doesn’t sound right… Under macOS it seems like Apple have a full-blown subwoofer crammed into the chassis! How can this be? As it turns out, the human brain is basically mush. Your brain can be tricked into hearing frequencies that aren’t really there by playing around with their harmonics, and this is exactly what Apple does to extend the bass response of a MacBook. On top of standard EQ filters to flatten out the frequency response these speakers can produce, James Calligeros wrote a bass extender called Bankstown, which uses the same psychoacoustic tricks Apple does to get the bass pumping on Linux!
Lastly, we worked with Pipewire and Wireplumber developers on a solution to automatically load our custom EQ and DSP configurations, as well as hide the “raw” output from other applications. This work was crucial, as we did not want the default desktop experience to be a fragile collection of kludges and hacks. Simply log in, and your speakers will work as they are intended to! No manual intervention required. The mechanism we designed and upstreamed is general and can be used to drive any devices with similar complex handling requirements.
This is just the tip of the iceberg. A more detailed look at the journey to speaker support is in the works, so stay tuned!
Energy-Aware Scheduling
Apple Silicon is the uncontested champion of power efficiency. It’s not unusual to get 12-15 hours of battery life out of a MacBook Air on macOS. Is Apple doing some secret sauce magic to squeeze these unbelievable numbers out of the ARM64 cores? Not really. They’re using tricks that Linux has been able to do for quite some time but, until now, no one has really taken advantage of.
Most x86 multi-core processors are comprised of identical CPU cores copy-pasted n-many times - they are symmetric, and fairly distributing work to the cores is relatively simple. Apple Silicon, of course, is a heterogeneous system comprised of the performance P-cores and the efficiency E-cores. Let’s try to schedule a task on Apple Silicon ourselves. We’re informed that Task A requires 10 “performance” (the actual metric is unimportant). Examining our device tree, we see the performance cores can provide 10 performance at 1.2 GHz, whereas the efficiency cores can only muster that at 2.4 GHz, its maximum operating point. So the scheduler places Task A on a performance core, since it can meet the performance requirements at a lower operating point.
However, we’ve made a critical mistake. The P-cores draw 3.7 W at 1.2 GHz whereas the E-cores actually only draw 1.6 W at 2.4 GHz (hence the name efficiency). The scheduler should have placed the task on an E-core! Energy-Aware Scheduling lets us tell the scheduler how much power each core uses at a given operating point, enabling it to make better scheduling choices that minimise energy consumption. This works a treat when the scheduler is making accurate predictions about a task’s performance requirements, but what happens when it can’t do that?
While working on speaker support, we found that Pipewire and Wireplumber were constantly being mis-scheduled onto P-cores. By default, the kernel prioritizes never being “late” above everything else for real-time threads, thus audio processing, due to its real-time nature, was always being given full performance. We did the math, and we found we don’t need anywhere near full performance to run our DSP code. To fix this, we gave Pipewire and Wireplumber the ability to use utilisation clamping, a scheduler feature that lets applications peg their performance requirements to a fixed range. We cap Pipewire and Wireplumber to an extremely low maximum performance so the scheduler restricts them to efficiency cores at their lowest operating point. Both still function perfectly, and we get to save oodles of battery life for our users! This awesome feature goes so underutilised that it wasn’t even enabled in the standard Fedora kernel until we asked for it to be a couple of weeks ago (CONFIG_UCLAMP_TASK), and we sincerely hope that its enablement in Fedora leads to more widespread adoption. It’s not just about reducing energy consumption, either: this feature can also be used in the other direction to optimize for performance in cases where the kernel’s scheduler doesn’t make good decisions by default, which can be important for games and other mixed CPU/GPU workloads.
Putting EAS and utilisation clamping together, we took a 15" M2 MacBook Air from about 6 hours of useable battery life just sitting at the desktop to about 8-10 hours of 1080p30 YouTube, 12-15 hours of desktop use, and an enormous 25-28 hours of screen-off idle time. We still have many more tricks up our sleeves to eke out more battery life, and a deep dive on EAS utilisation clamping is in the works. Watch this space!
Userspace & Distro
kernel-16k - Flock to Fedora
Back in the wild wild A-for-Alpha Arch Linux ARM (ALARM) days, we had two flavors of the Asahi kernel package: a baseline flavor with the necessary features enabled for Apple Silicon hardware to run Linux, and an “edge” flavor that contained the more experimental work, which some of you opted-in to be our guinea pigs by manually installing pacman -S linux-asahi-edge. Understandable, as the -edge package teased some irresistible offers like DCP backlight/brightness control, system-wide sleep, and GPU drivers. Fun fact, “edge” was the same git branch all along, we just disabled some riskier drivers via kernel configs. But by the end of ALARM, we pretty much advised everyone to install -edge as those drivers were mature and well-tested. In fact, Xorg+ALARM still has a bug where the cursor floats a few pixels above if you don’t have GPU drivers installed (and magically goes away once you install -edge). These edge vs. non-edge discrepancies were only causing the devs and our users pain…
We took this distro migration chance (flock to fedora!) to remove -edge entirely. All the code that was provided through the -edge flavor has been stabilized and released into the main kernel flavor. The unified linux kernel package maintained by Neal Gompa enables everything we had before under a single kernel-16k package, which means you get complete, high-quality hardware integration out of the box! Additionally, he has contributed the framework for the kernel-16k flavor to the Fedora kernel package to be enabled in the future once more of the kernel work lands upstream.
Segueing from kernel to userland and distro…
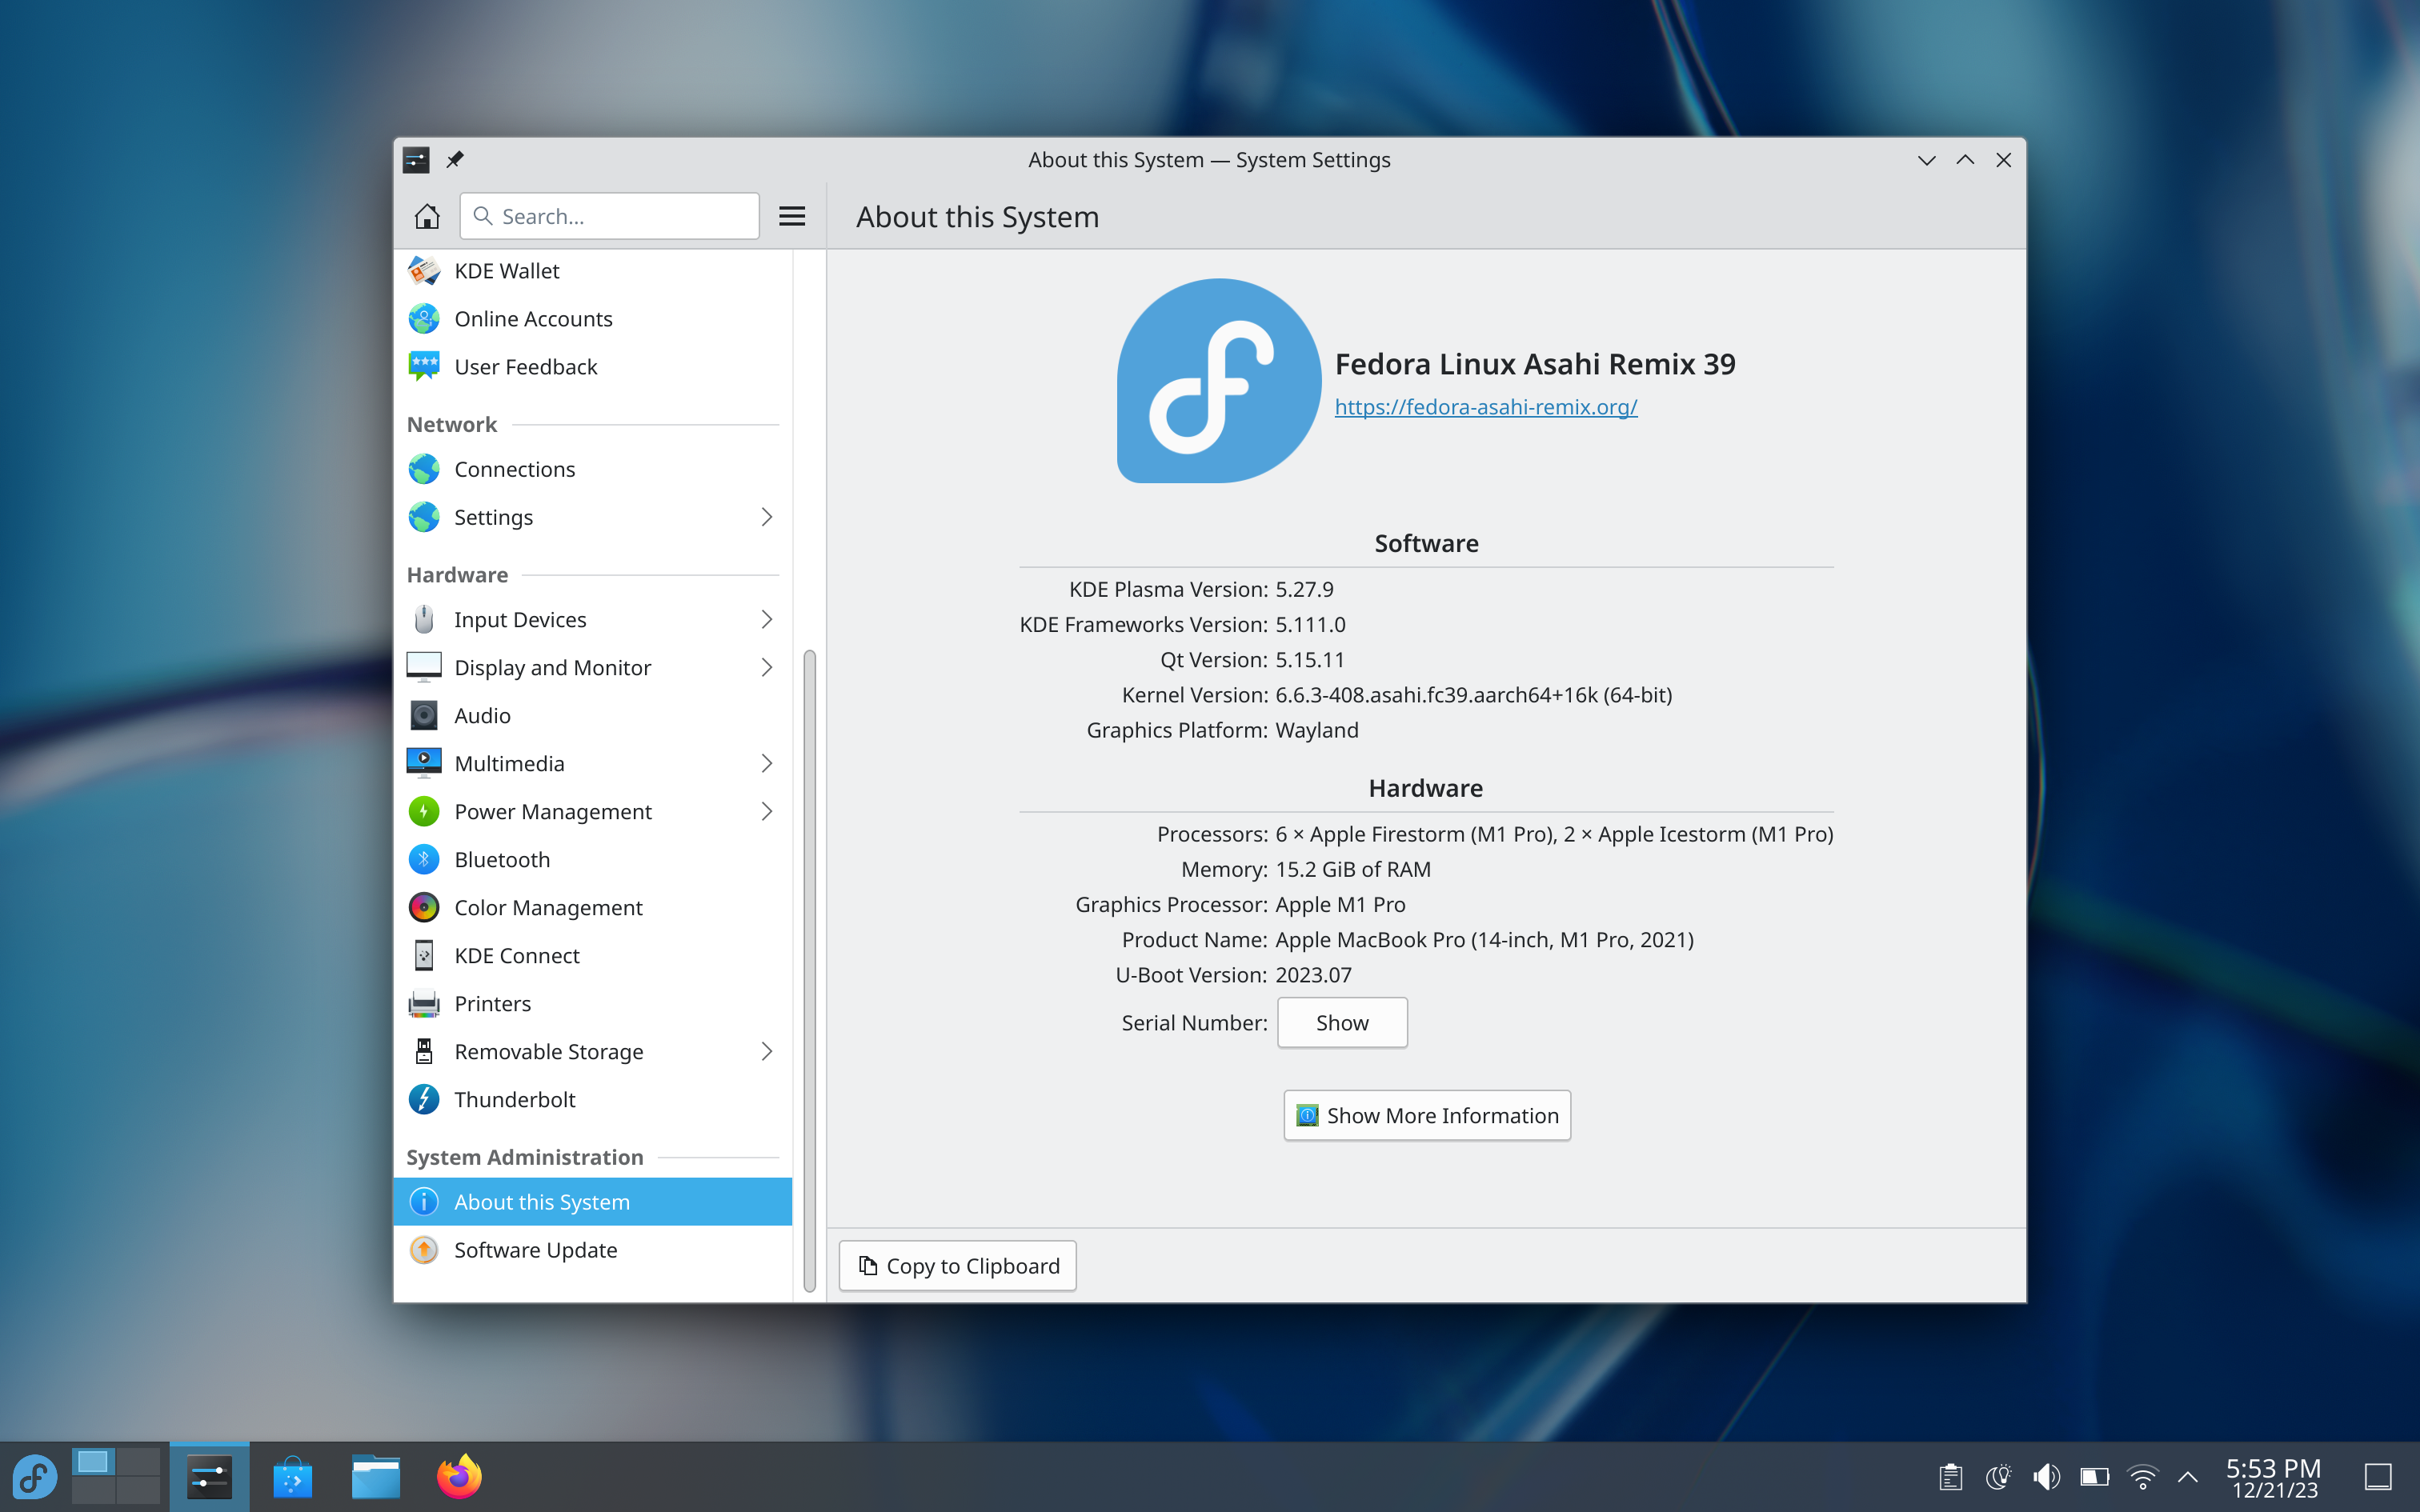
Fedora 39 Asahi Remix KDE System Information
Widevine - Netflix and Spotify on Asahi
What good is a desktop if Netflix and Spotify doesn’t work? Media distribution services often require a Digial Rights Management (DRM) system to deliver protected premium content, which goes as smoothly on FOSS Linux as you’d expect. While Apple works directly with Netflix to deploy their custom DRM solution called “FairPlay”, FairPlay simply does not exist on Linux, and the hardware restricts it to only unmodified macOS installs. Still, many people need their Spotify. Widevine is Google’s proprietary “cross-platform” content protection solution, so simply installing the Widevine blob should make Netflix and Spotify work. Unfortunately, one does not simply “install” Widevine on a platform that isn’t officially supported by Google.
Very recently, some ARM64 Linux-ish platforms with Widevine did pop into existence: some ChromeOS laptops. Unfortunately ChromeOS is only “Linux-ish”, and ChromeOS binaries cannot run unmodified on standard ARM64 desktop Linux. The Widevine blobs had to be manually patched to work around both memory page alignment issues and glibc incompatibilities. Despite being a horrendous hack, we’ve been able to package it into a reliable user-friendly installer that ships preinstalled on Fedora Asahi Remix and should work on most other ARM64 distributions with a reasonably recent glibc. The whole process can be summarized in meme format, but you can also check out David Buchanan’s original write-up here. Netflix and Spotify for all.

You wouldn't pay for 4K Netflix and...
Source: David Buchanan, The Quest for Netflix on Asahi Linux
OpenH264 - Lawyers love this one H.264 trick
In tangentially related news, certain moving picture compression standards (e.g. H.264/H.265) are encumbered with vociferously defended patents, so Fedora cannot legally ship them. marcan takes pride in Asahi’s seamless out-of-the-box experience, and H.264 being video people’s JPEG or the “fallback codec”, out-of-the-box H.264 support was imperative. Fedora does support H.264 via OpenH264 from Cisco, which is an open source H.264 implementation that is distributed as a pre-compiled binary. Cisco Systems covers the appropriate licensing royalties, as long as the binary is downloaded and installed directly from their repository. Traditionally, this means that users have had to manually install OpenH264 after installing Fedora Linux.
Since our Asahi Linux installer happens to install directly from the Internet anyway, we added support for pre-downloading these codec packages directly from Cisco’s servers as part of the installation process. A little script then takes care of immediately installing them on first boot, and the result is that Fedora Asahi Remix is the first Fedora spin to ship with H.264 straight out of the box, fully lawyer-approved.
Users who wish to use other patent-encumbered codecs under their own resposibility may choose to install them from third-party repositories, such as the libavcodec-freeworld package in RPM Fusion. Note that RPM Fusion is not affiliated with Fedora nor Asahi Linux.
Work In Progress…
Now for some tricks we have up our sleeves. These may or may not arrive sometime in 2024.
Hardware Video Decode
OpenH264 may decode H.264 by definition, but it cannot decode H.265/HEVC, which is basically H.264 cranked up including the licensing part. OpenH264 could also be faster: it has very little SIMD code, and even less ARM64 SIMD (Janne would know..). The release of speaker support has heightened the need for fast, high-quality, and power-efficent video decoding. While software decode on the M-series cores is faster than some hardware decoders, some users report their laptop battery converts to released heat at a noticeably faster rate than macOS. We want to at least match macOS efficiency numbers.
The Apple Video Decoder is a multiformat programmable hardware driven by a custom instruction set specialized for decoding video. AVD, despite its complexity, oddly enough lacks a firmware handling the low-level decode logic, so we have to RE literally every bit ourselves (side effect, the entire driver/firmware stack will be fully open-source). And video codec standards being 880-page manual beasts, it’s not the easiest effort. Eileen’s avd repo currently boasts H.264 High Profile, High 4:2:2 Profile, High 10 Profile, and High 10 4:2:2 Profile, so that beats openh264 in features alone. HEVC is nearing conformance. A VP9 proof-of-concept exists.
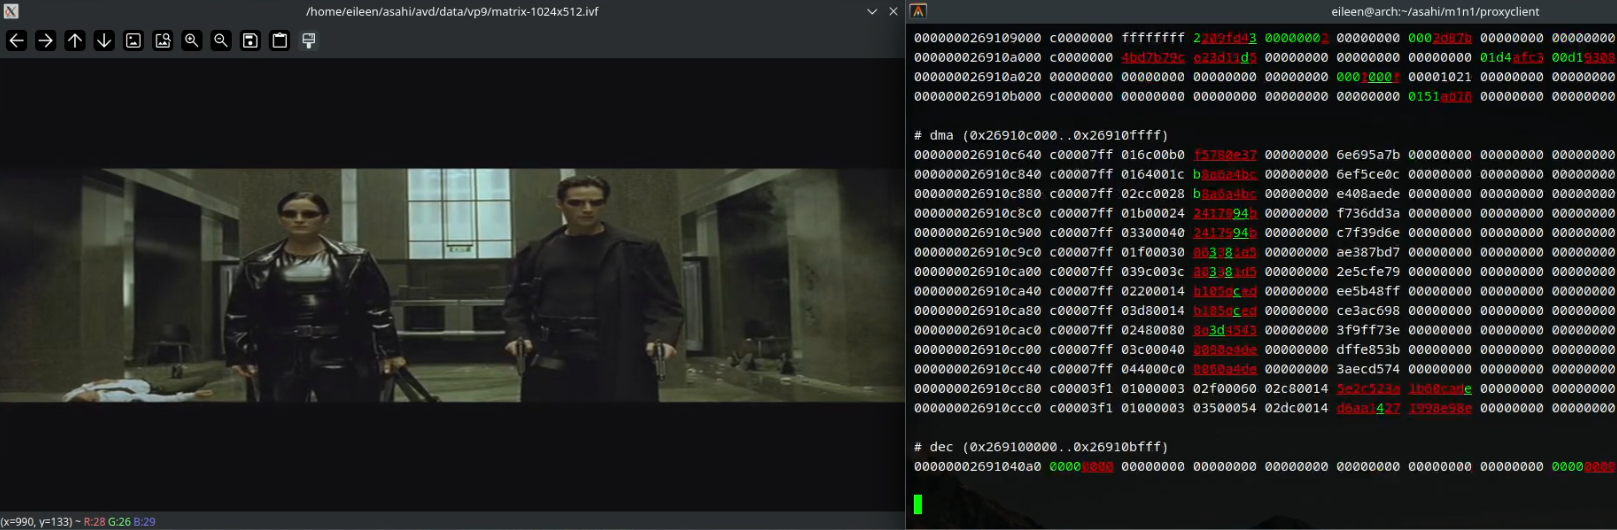
AVD decoding VP9-encoded Matrix shootout scene over m1n1 proxy.
Another hurdle is the Linux video hardware acceleration API. Current options cannot yet handle all the demands of a video decoder driver that lacks a firmware handling a signifcant chunk of the decoding logic. V4L2? VA-API? Vulkan? To be answered in 2024.
“Can we run Steam?”
Apple Silicon devices use 16K pages, but the rest of the (x86) world runs on 4K. Running Apple Silicon on a 4K kernel is technically feasible, but it requires a number of invasive and controversial upstream changes and comes with a significant impact on performance. A better approach would be running the host with the native 16K kernel, and using a 4K kernel in a VM for those problematic workloads, assuming the performance of the VM is good enough for the use case.
But 3D performance in VMs is not so good. Or is it? At XDC 2022, Rob Clark demonstrated that, with a technique called “DRM native context”, it is possible to achieve near-native performance for 3D acceleration in a VM. Now the question is whether we can port DRM native context to Asahi Linux, given that it needs to be individually implemented for each DRM driver. This is a quite significant project and involves changes in multiple components. We need to implement the equivalent of Rob Clark’s work on freedreno for the asahi/agx drivers both in Mesa and virglrenderer. We also need to extend libkrun (a lightweight VMM used to start and drive the VM) to support virtio-gpu+rutabaga, along with virtio-snd support, as audio tends to be quite an important feature for gaming ;-)
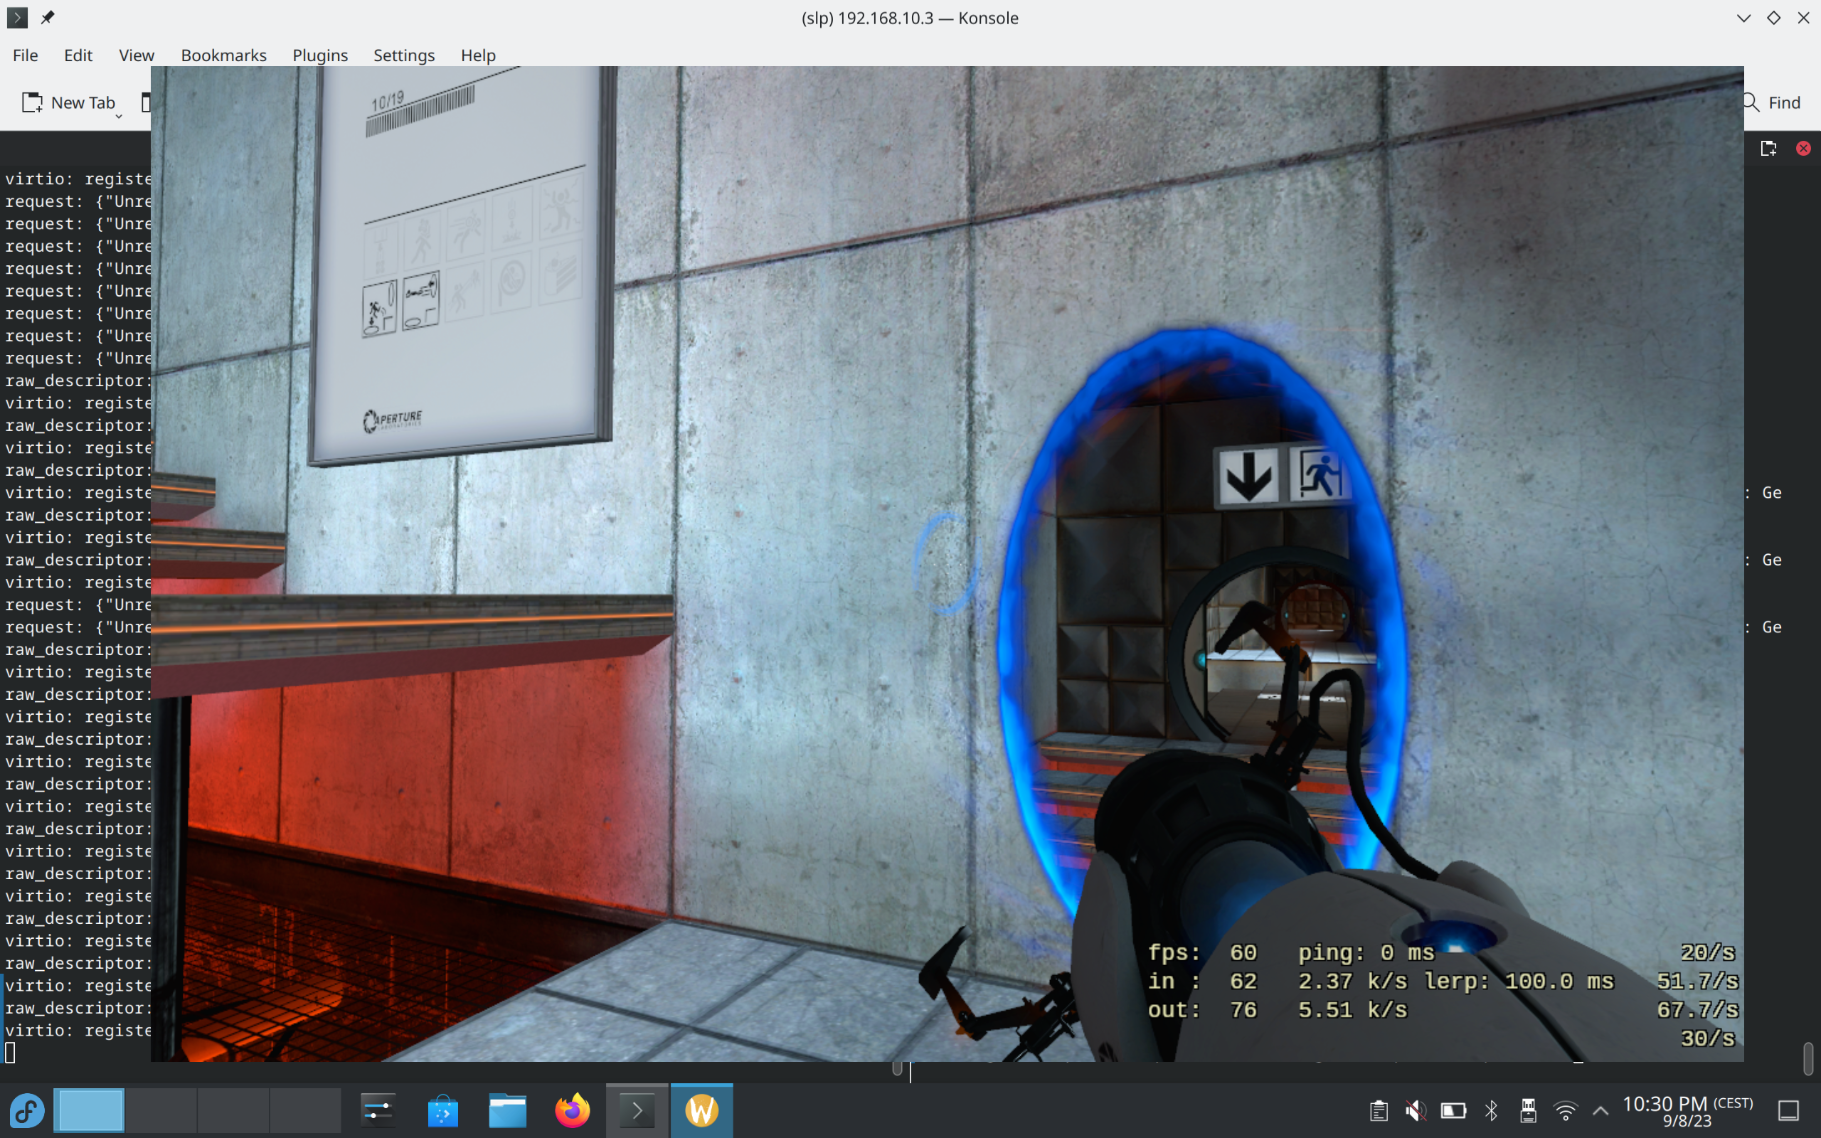
Portal running in a VM in Asahi at ~60 FPS.
At the time of writing, there’s an evolving MR for virglrenderer, and PR for libkrun adding the necessary pieces. There’s also a blog post with instructions for giving it a try using downstream patches. Sergio Lopez hopes to have everything merged upstream and shipped ready-to-use in Fedora Asahi in the coming months.
DP Alt Mode & Thunderbolt
17:30 <sven>: you can also mention that dp altmode and thunderbolt is in progress and should come sometime in 2024
Install Today!
We hope you enjoyed catching up on some of the things we’ve been working on. Don’t forget to visit our Fedora Asahi Remix announcement page, and also check out our brand new User Guide, which will be getting more of our user-oriented documentation going forward. See it for yourself. Install today:
curl https://alx.sh | sh